Showing posts with label holly would press. Show all posts

10.26.2012

HWP WALL CALENDAR GIVEAWAY!


It'll be time to change calendars before you know it! Calendars make great gifts for the holidays too so I'm giving away 2 of my new, large 11" x 17" year-at-a-glance calendars (one for you, one for a friend). You can frame them, tack them to the wall, tape them up with washi tape - whatever you want. 

How to enter: 
Just leave a comment below with the number of the 2 calendars you would like (ex. 1 and 2) or you can enter the same number twice.

*For an extra entry, like HWP on Facebook and leave a comment on the post about the giveaway too!

I'll announce the winner on Monday morning. Good luck! :)

One entry and bonus entry per person. Winner picked at random.

*UPDATE: This giveaway is now closed. Thank you for your participation!

10.04.2012

CUSTOM WORK: NEW YEAR'S EVE WEDDING INVITATIONS

Today I wanted to share a custom project that I worked on for a friend of mine who is getting married on New Year's Eve. Karen and Tim were wanting invitations that would set the tone for their wedding, which is going to be a very fun, sparkly celebration. They wanted bold typography and lots of color. 

New Year's Eve wedding invitations by Holly Would Press

I heat embossed these tags with gold ink to bind her different pieces together inside the envelope.

New Year's Eve wedding invitations by Holly Would Press

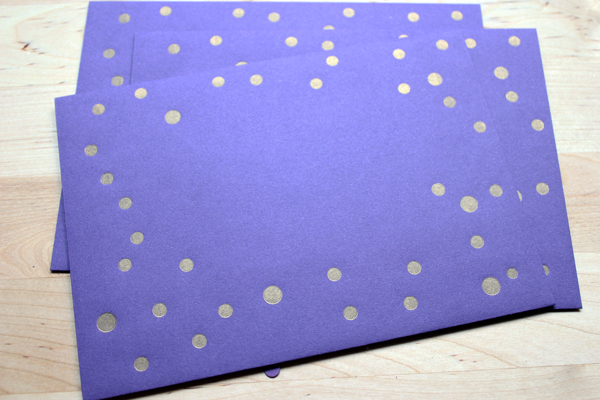
I also printed metallic gold confetti onto the front of the envelopes with my letterpress.They turned out really shiny in person because of the contrasting gold on deep purple.

New Year's Eve wedding invitations by Holly Would Press

New Year's Eve wedding invitations by Holly Would Press

New Year's Eve wedding invitations by Holly Would Press

These envelopes were addressed with a metallic silver pen (though it photographs white). 

New Year's Eve wedding invitations by Holly Would Press

Overall I think her invitations captured the celebratory spirit of her wedding that she was wanting and I think they will get people excited about toasting the new year with her and her new hubby.

Thanks, Karen & Tim!

10.01.2012

NEW WEDDING ORDER PACKAGING

Holly Would Press Packaging

I have written before about my packaging for HWP, but lately I've been wanting to take it up a notch, especially for wedding orders. Packaging is something that I find not only fun, but also really important. The wedding invitations industry is pretty flooded right now, so I want my customers to know how much I appreciate them choosing me out of all the other options. I think one of the best ways to do that is to make the experience of opening their order really exciting and fun. I want them to feel like they're getting a present, not just a purchase.

Outside the box:
I added this sticker...

...and a logo stamp to make the boring brown box a little more unique.

Inside:
I made a quick and easy little garland out of washi tape and strung it to the top of the box.
Holly Would Press Packaging

Then I added colorful elements like the thank you sticker and mini business cards. I want the box to feel like a celebration, so I punch some big confetti circles out of tissue paper and sprinkle them around the box. 

Holly Would Press Packaging

One of my favorite additions to my packaging is a little muslin bag with these sheets I designed with tips to have a more joyful (less stressful) wedding. As exciting as the engagement experience is, it's also a time where a lot of couples feel stressed and overwhelmed, so I added these as a way to remind couples to enjoy this time and remember what's important.

Holly Would Press Packaging

I hope that these additions will make my customers smile, and make opening their mail a little more exciting!


9.17.2012

DIY SCRATCH OFF COUPON

I was recently asked to contribute a grab bag item to a local bridal show and I found this tutorial for creating scratch off cards that I used as inspiration. I decided to make my own but with a few changes. 

First I printed and cut several cards with a design that included a 1" circle with 1 of 3 different discounts on it. My one piece of advice for this project: make sure the word or picture that is underneath the scratch off sticker is in a dark color. At first, I printed blue circles with white words and it was not very visible beneath the scratch off sticker.
DIY scratch off coupons (via Holly Would.)

Then I placed these 1" scratch off circle stickers over the circle in the design that included the discount and code.
DIY scratch off coupons (via Holly Would.)

DIY scratch off coupons (via Holly Would.)

DIY scratch off coupons (via Holly Would.)

 It's as easy as that! The scratch off stickers are not very expensive, and this project is so simple but unique. They would be great for the holidays or for a creative gift project.


8.03.2012

STATIONERY PACKAGING & SHIPPING IDEAS


It took me quite a while to get the packaging figured out for my business, Holly Would Press. I think the presentation of your products is so important (especially with an online business) and I wanted something that would make people happy and reflect the brand. Here is the packaging I decided on.

Every card set gets bound with a belly band that has my logo on it. Then, wedding invitations are placed in a clear box and wrapped with yellow and blue bakers twine.

Stationery sets are bound with twine, and placed in a smaller paper box with a clear cover and a logo sticker. Rubber stamps are packaged inside a muslin bag with a hand stamped logo on it.


I punch my own tags with a paper punch and scrap paper (I have a lot of scrap paper from cutting out cards and invitations), then I heat emboss a "thank you" stamp on the front, and hand write a message on the back of the tag.


I put this smaller box in a more sturdy shipping box with a business card inside.


As far as shipping, it took me a while to organize all of the supplies because my husband and I live in a small apartment. I keep all of the large boxes in a laundry basket stored underneath a table:


Then I have a cart where I keep all of my smaller shipping and packaging supplies:


I string the bakers twine through these little spaces, which makes it really easy to cut a long piece of both of them at once and keeps the twine from getting all tangled:


I make lots of thank you tags ahead of time and keep them in a farmer's market basket so they're ready to go:


Other essentials: logo stickers, heat embosser, a scale for weighing packages, and bubble mailers.


I hope this is helpful for anyone starting a new business and trying to get organized! Do any of you have any other ideas?


LinkWithin

Related Posts Plugin for WordPress, Blogger...