Showing posts with label diy. Show all posts

1.21.2014

EASY DECORATING TIP: RAISE THE CURTAINS!

I hope you guys are having a great week so far. I've been busy juggling what feels like a million things, one of which being decorating our new house (one of the most fun things on my to do list!). Today, I just wanted to share a super simple way to make your room look bigger and more elegant: raising the curtains up to the ceiling!

Below, you can see one set of curtains placed at the normal level (just above the window). I originally bought this set of curtains because they were the only length that I could find at Target and I just wanted to have it done. Plus I didn't really think having the taller curtains would make that much of a difference. Then I went online and saw that they had longer sizes (94") so I decided to put the shorter set in one of the guest rooms and put these longer ones in our living room. These are the curtains that we got. Hubbs raised up the curtain rods for me and...

EASY DECORATING TIP: RAISE THE CURTAINS!

...ta da! Doesn't it look so much better? It's such an easy change but makes a huge difference. I feel like our living room looks so much more, like, high end now. I love it! The living room is almost done, by the way. All that's left is side tables, hanging a gallery wall, and getting some more accessories and then I will be sharing a living room tour!

EASY DECORATING TIP: RAISE THE CURTAINS!

Have a great week!

12.30.2013

PAINTING KITCHEN COUNTERTOPS!

One of the easiest ways that we have made over our new house is with paint. As I've mentioned before, when we bought the house, it was 50 shades of beige. Between the floors, walls, and counters, the colors just had to go. But the problem with changing a kitchen is obviously, it's expensive. While we would love to eventually get new countertops and make a few other changes in the kitchen, we are not in a place where that is our priority right now.


Sooo I did a little searching, and I found...counter top paint! Seems a little crazy right? Well, it actually works really well! I got the Rustoleum Counter Top Coating paint at Home Depot (not to be confused with their product called "countertop transformations" which is much more complicated and expensive) and I got it in the color "pewter" which is dark gray.


It includes detailed instructions, but basically you just clean the counters really well, tape them off, and roll on the paint with a brush (tip: use a brush that is meant for super smooth surfaces). If you're wondering, as I was, how it holds up with being in such a high traffic area, it works really well! The paint is not like regular paint. It is SUPER sticky (takes forever to get off of your hands if you get some on you) and the thickness of it means that it doesn't chip like regular paint would. Our counters have a couple of spots that look a little rough (caused by not using the right kind of brush) but overall, it looks really smooth and nice and is a great, budget friendly alternative to new countertops. This will hold us over until we can afford to make that investment. Oh, and I also painted the walls in "Revere Pewter"(half strength) by Benjamin Moore. You can see more pictures of that color here!

What do you think? Would you paint your countertops?? :)

10.11.2013

DIY ART

With all of the new house planning, I'm learning how quickly things can add up, so any way of cutting costs is super helpful right now. I came across these 4 DIY art projects that I think look way more expensive than they really are! Which is your favorite?

DIY art

sources:

While we're on the subject, all of the instant download art in the Etsy shop is BOGO free this weekend, so if your office could use a little sprucing, now is the time! 2 for the price of one! Just use the code BOGOPRINTS.

DIY art

4.09.2013

DESIGNING A GALLERY WALL

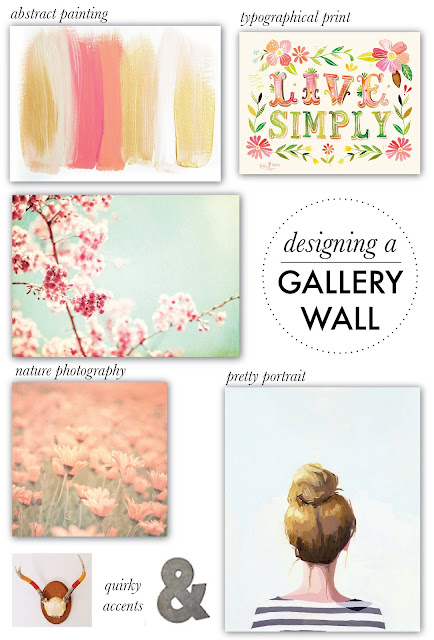
As part of my spring cleaning project, I'm working on hanging more art and making our apartment feel more homey. With our new layout, which I'll show photos of soon, there are a couple of really bare walls that are just screaming "Make me a gallery wall!". I studied some of my favorite gallery walls (totally normal way to spend your time), and realized that they usually have a mix of different types of art (not all abstract/typography/etc). Here is a mix of art that I found, mostly on Etsy, that I think would make a really pretty gallery wall:

DESIGNING A GALLERY WALL (via Holly Would)

I like the contrast of the really whimsical photography with the bold colors and industrial-style ampersand. What do you think?

links:
abstract painting | typographical print | nature photography 1 | nature photography 2 | antlers | zinc ampersand | portrait

11.19.2012

FREE MASON JAR LABELS DOWNLOAD

free mason jar labels download (via Holly Would)

Today I want to share a project that I did for the Drifter & the Gypsy blog - free printable mason jar labels! These are great for gifts and so easy to put together - just print, cut, and place inside of a mason jar! Click HERE to download the labels (below). 

free mason jar labels download (via Holly Would)

free mason jar labels download (via Holly Would)


free mason jar labels download (via Holly Would)


11.08.2012

CHRISTMAS GIFT PACKAGING IDEAS

Can you believe it's November already? That means it's time to start getting your Christmas gifts ready! I think it's so much fun figuring out what to get everyone and to me it's even more fun wrapping up all the presents! Here are some of my favorite Christmas packaging ideas from around the web and Pinterest - Do you have any creative packaging ideas for the holidays?

Christmas gift packaging ideas (via Holly Would)

Sources (from top-bottom, left-right)
1 | 2 | 3 | 45 | 6 | 7 | 8

10.22.2012

DIY DIAMOND RUG

Today I'm excited to share a DIY project that I made for the Drifter and the Gypsy blog. Check out the photos below and go to the post to see the full tutorial!

DIY Diamond Rug by Holly Would

DIY Diamond Rug by Holly Would

DIY Diamond Rug by Holly Would

10.20.2012

DIY HEART SWADDLING BLANKET

Dying over this adorable DIY swaddling blanket from the Delia Creates blog. What a sweet (and inexpensive) baby shower gift this would be - holy cuteness! Check out her post for the tutorial.

DIY swaddling blanket by Delia Creates (via HollyWould)
swaddling blanket by Delia Creates

10.15.2012

DIY CANVAS TRICK OR TREAT BAG + FREE DOWNLOAD

DIY canvas trick or treat bag with free download (via Hollywould)
Click HERE to download this "trick or treat" file, shown above, and follow this tutorial that I did a few months ago to make your own canvas trick or treat bag for any cool kid in your life!

10.02.2012

PAINTED PUMPKIN IDEAS

It's already October! That means it's time to start thinking about fall decorations. I've never been a big Halloween fan, but I do like to decorate pumpkins in the fall, and painting rather than carving seems like a great alternative. Less mess and more options! Here is some inspiration:

painted pumpkin ideas (via Holly Would)


Image Sources & Tutorials:


10.01.2012

NEW WEDDING ORDER PACKAGING

Holly Would Press Packaging

I have written before about my packaging for HWP, but lately I've been wanting to take it up a notch, especially for wedding orders. Packaging is something that I find not only fun, but also really important. The wedding invitations industry is pretty flooded right now, so I want my customers to know how much I appreciate them choosing me out of all the other options. I think one of the best ways to do that is to make the experience of opening their order really exciting and fun. I want them to feel like they're getting a present, not just a purchase.

Outside the box:
I added this sticker...

...and a logo stamp to make the boring brown box a little more unique.

Inside:
I made a quick and easy little garland out of washi tape and strung it to the top of the box.
Holly Would Press Packaging

Then I added colorful elements like the thank you sticker and mini business cards. I want the box to feel like a celebration, so I punch some big confetti circles out of tissue paper and sprinkle them around the box. 

Holly Would Press Packaging

One of my favorite additions to my packaging is a little muslin bag with these sheets I designed with tips to have a more joyful (less stressful) wedding. As exciting as the engagement experience is, it's also a time where a lot of couples feel stressed and overwhelmed, so I added these as a way to remind couples to enjoy this time and remember what's important.

Holly Would Press Packaging

I hope that these additions will make my customers smile, and make opening their mail a little more exciting!


9.17.2012

DIY SCRATCH OFF COUPON

I was recently asked to contribute a grab bag item to a local bridal show and I found this tutorial for creating scratch off cards that I used as inspiration. I decided to make my own but with a few changes. 

First I printed and cut several cards with a design that included a 1" circle with 1 of 3 different discounts on it. My one piece of advice for this project: make sure the word or picture that is underneath the scratch off sticker is in a dark color. At first, I printed blue circles with white words and it was not very visible beneath the scratch off sticker.
DIY scratch off coupons (via Holly Would.)

Then I placed these 1" scratch off circle stickers over the circle in the design that included the discount and code.
DIY scratch off coupons (via Holly Would.)

DIY scratch off coupons (via Holly Would.)

DIY scratch off coupons (via Holly Would.)

 It's as easy as that! The scratch off stickers are not very expensive, and this project is so simple but unique. They would be great for the holidays or for a creative gift project.


9.12.2012

1 YEAR ANNIVERSARY GIFT IDEA

I told you about the gift wrapping technique I used for Wes' anniversary gift, but I didn't tell you what the gift actually was! I know that traditionally 1 year gift is "paper" but I didn't know what the heck to do with that so I was talking to my sister, and she said that she heard that the modern one year gift is something related to time. I liked this much better so I ended up getting him a watch, and I made a whole little "time" theme for the gift.

time themed 1 year anniversary gift idea (via HollyWould)

I quickly drew up this watch card to go with the theme.

& In case you were wondering what my anniversary gift was, it was this gorgeous dress from Anthropologie. Wes apparently has a sixth sense when it comes to gifts because I was drooling over this dress at Anthro the other day but he wasn't even with me to know that!

anthropologie sangeet dress
Sangeet Dress, Anthropologie

9.11.2012

DIY STAMPED FABRIC GIFT WRAP

DIY stamped fabric gift wrap (via HollyWould)

Yesterday was my one year anniversary, which of course involved some gift giving! I decided to make his gift a little more special by wrapping it in fabric rather than wrapping paper. 

I just took an old sheet (that Chester had chewed a hole in...ugh) and cut it into a square. Then I stamped a pattern with a heart stamp and regular ink pad that I already had. After I made the pattern, I let the fabric dry. Then I tied the 4 corners at the top around the gift, and stamped a gift tag to match.

This is a super easy project that makes a gift a little more special. I might do the same thing around Christmas time with a tree or snowflake stamp!

9.03.2012

DIY EVENT DECOR: TWINED WRAPPED JARS

This weekend, I'm styling a country/barn wedding, so I've spent the last couple of weeks wrapping twine around mason jars to make them a little more rustic looking. It's a small change but it makes a big impact. Twine wrapped jars are great for a picnic style wedding or party, and are really affordable and easy to make. 
DIY twine wrapped mason jars for a wedding or party (via HollyWould)
All you need is some tacky glue, twine and jars. 

When you start, leave about an inch of twine before you start glueing it to the jar. Then as you wrap the twine around the jar, cover up that excess piece. At the end, just cut the twine and glue the entire bottom row of twine to the jar. I also put a drop of glue on top of the very end of the glue to make sure it didn't fray at the end. The glue dries clear so it isn't noticeable. 

Happy decorating!

(photo above via Airth and Ocean)


8.28.2012

FREEZER PAPER "SCREENPRINTING"

Yesterday, I shared pictures from the Etsy Craft Party we threw on Friday. Today, I wanted to share a tutorial for one of the crafts we did at the party: Freezer Paper Screenprinting! This is a really easy craft that I think would be great to do with kids too! Here's what you do:

1. Print out a design on regular printer paper. 
We chose the Nashville skyline to go with our theme

2. Trace the design onto the smooth paper side of a piece of freezer paper.


3. Cut out the inside of the design. 
I would recommend doing a simpler design if you're doing this with kids - this part was kinda tricky, especially since we were using scissors rather than an x-acto knife.

4. Carefully iron the freezer paper to the fabric.

5. Paint a thin layer of fabric paint inside the design.
*It also helps to place a piece of cardboard under the fabric or inside the tote so that the paint doesn't bleed through.


6. Slowly remove the freezer paper and you're left with a "screenprinted" design!

Here we are with all of our creations!

8.27.2012

ETSY CRAFT PARTY 2012

Friday, my friend Lindsey and I threw a craft party as part of the worldwide Etsy Craft Party 2012.  The theme this year was "Wish You Were Here" so our party was a southern, Nashville theme! 

(Lindsey and I accidentally wore almost identical dresses - ha! Apparently blue and white seersucker says "Nashville" to us)


Nashville is all about southern food and music, so we incorporated those details in our party. We also used the Nashville skyline for a lot of our decorations and for both crafts.


 The crafts that we did were a postcard template that everyone could decorate and a homemade screenprinting craft using freezer paper (I'll be sharing a tutorial post tomorrow!). 


*Update: Click here to see the freezer paper screenprinting tutorial!

LinkWithin

Related Posts Plugin for WordPress, Blogger...